
Connect to Snowflake
Sigma provides robust connection support for Snowflake data access.
Sigma queries the Snowflake connection every 24 hours to index the catalogs, schemas, tables, and views. This process is automated, and reads from the Snowflake metadata in the cloud services layer. Under normal usage, this process results in 0 credit consumption; however in cases where there is minimal usage in a 24 hour period, credit consumption may occur. See Understanding Overall Cost in the Snowflake documentation.
For information about Sigma feature compatibility with Snowflake connections, see Region, warehouse, and feature support.
Requirements
- You must be assigned the Admin account type.
Create a connection
Sigma offers two ways to create a connection between your Snowflake data warehouse and your Sigma organization:
- To connect to your Snowflake data warehouse by creating a connection in Sigma, see Connect to Snowflake from Sigma.
- To create create a connection using Snowflake Partner Connect, see Connect to Sigma using Snowflake Partner Connect.
When creating a connection, you specify a Snowflake account and role that Sigma will use to connect to the database. You can change which account and role is used to connect at any time. Sigma will have access to all of the tables and schemas that the connection account has access to.
To restrict what data different Sigma users see, you can set up permissions in Sigma using teams. See Data permissions overview.
Connect to Snowflake from Sigma
Follow these steps to create and configure a connection:
- Create a new Snowflake connection
- Specify your connection credentials
- Configure an authentication method:
- Configure write access
- Configure connection features
Create a new Snowflake connection
-
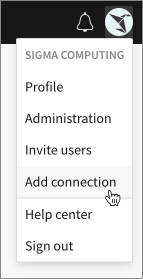
Click the user icon at the top right of your screen.
The user icon is usually composed of your initials. -
In the drop-down menu, select Add connection.
-
The Add new connections page appears.
-
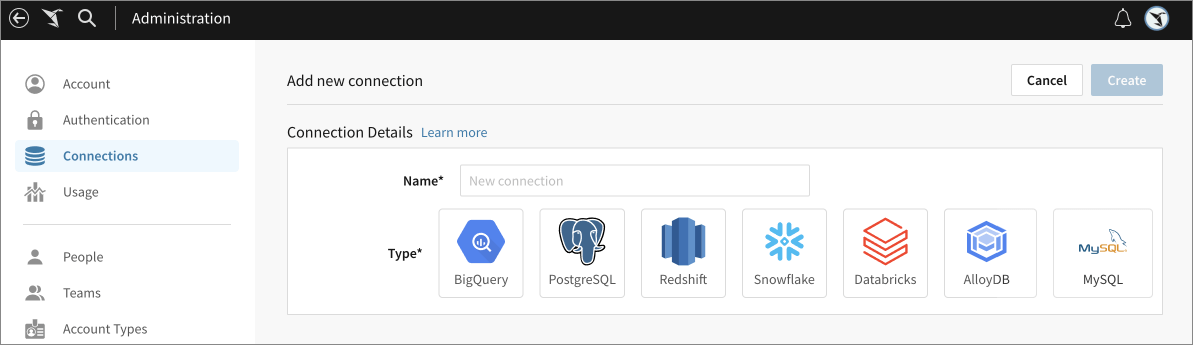
In the Connection details, specify these:
Name Enter a Name for the new connection. Sigma displays this name in the connection list. Type Select the tile that represents the data warehouse you use. Here, click the Snowflake tile.
Specify your connection credentials
In the Connection Credentials section, fill out the required fields:
-
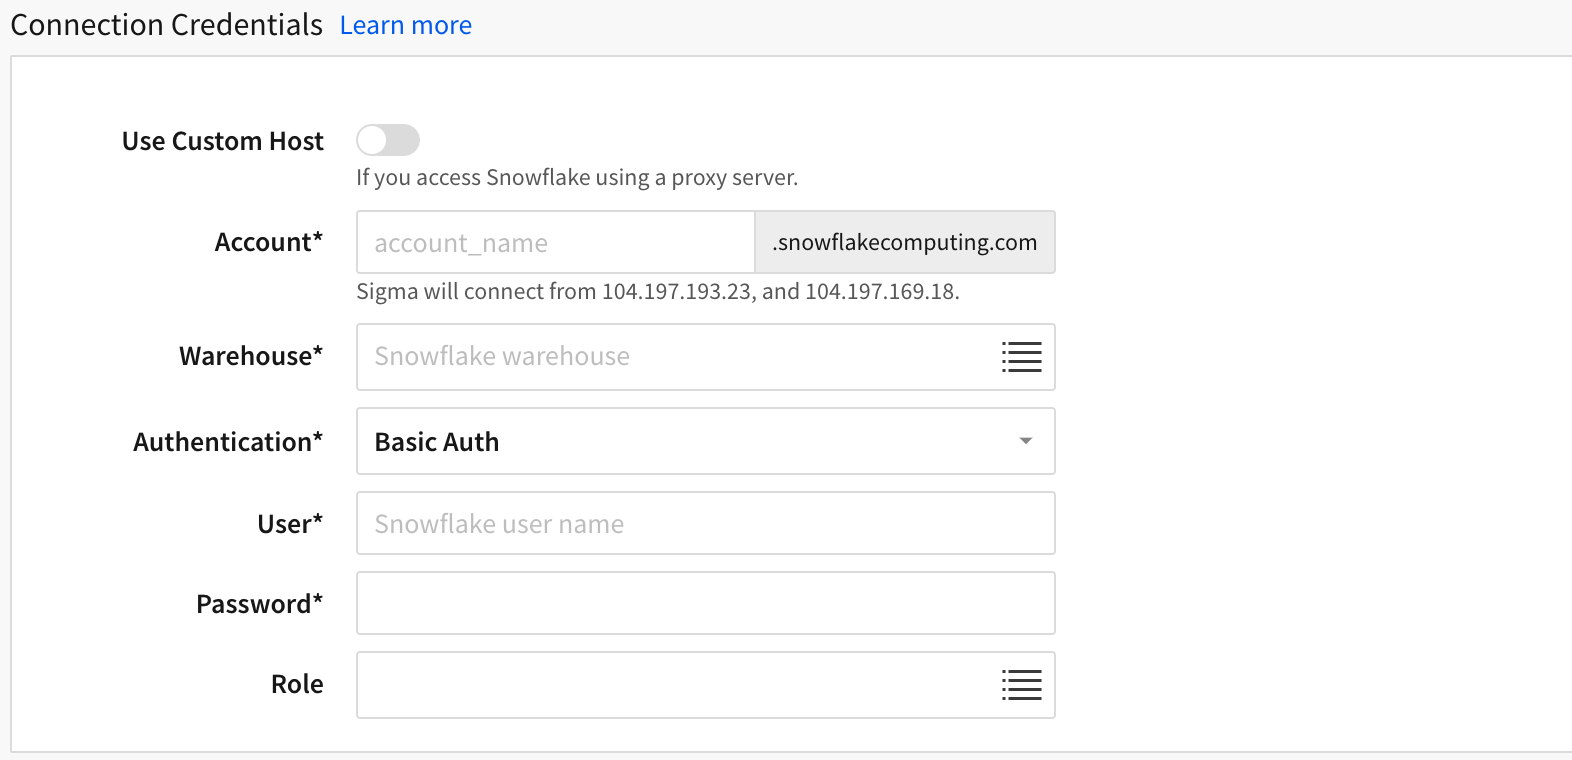
[optional] If you access Snowflake using a proxy server, click the toggle next to Use Custom Host to enable it, then enter the Snowflake Custom Host name.
-
In the Account field, enter the account name of your Snowflake instance.
-
In the Warehouse field, enter your warehouse’s name as listed in Snowflake.
Click the item list icon (
) in the Warehouse field to set the warehouse using user attributes. See Configure user attributes on a Snowflake connection.
- Click the caret (
 ) next to Authentication to choose your authentication method, then fill in the required fields for the method you select:
Connect to Snowflake with basic authentication
Select Basic Auth to connect with a username and password.
-
In the User field, enter your Snowflake username.
-
In the Password field, enter your Snowflake password.
-
[optional] Enter a Snowflake Role to be used on this connection. If no role is provided, the account will assume its default role as configured in Snowflake.
Click the item list icon (
Next, see Configure write access and Configure connection features for additional options. Or, if you are finished configuring your connection, click Create at the top right to create your connection.
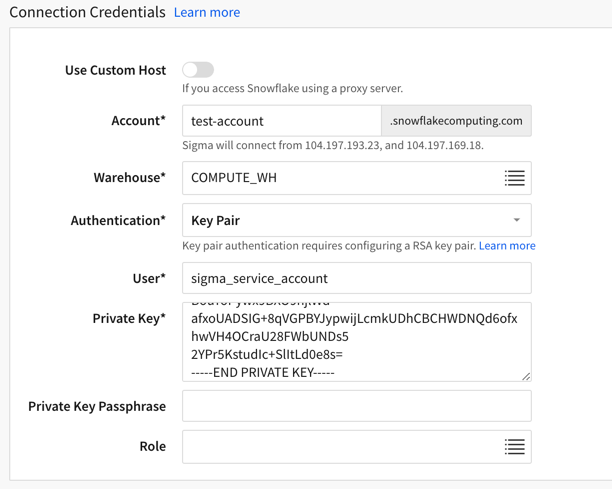
Connect to Snowflake with key pair authentication
Select Key Pair to authenticate the connection using a combination of public and private RSA key pairs. This method requires that you have a public and private key already created, and a Snowflake account configured with the public key. See Key-pair authentication and key-pair rotation in the Snowflake documentation. For a full walkthrough of all prerequisite steps as well as detailed steps on how to rotate your keys, see Sigma’s Snowflake Key-pair Authorization QuickStart.
-
In the User field, enter the Snowflake username that is configured with the public key.
-
In the Private Key field, paste the private key text, including the header.
-
[optional] Enter the Private Key Passphrase, if you configured one.
-
[optional] Enter a Snowflake Role to be used on this connection. If no role is provided, the account will assume its default role as configured in Snowflake.
Click the item list icon (
Next, see Configure write access and Configure connection features for additional options. Or, if you are finished configuring your connection, click Create at the top right to create your connection.
Connect to Snowflake with OAuth
Select OAuth if you have OAuth enabled on your organization, and you would like to use it on the connection. See OAuth in Snowflake for all prerequisite steps.
[optional] To use a Snowflake service account for the OAuth connection:
-
Click the toggle next to Service Account to enable it.
-
Enter a User and Password for the Snowflake service account.
-
[optional] Enter a Snowflake Role to be used on this connection. If no role is provided, the service account will assume its default role as configured in Snowflake.
Click the item list icon (
Next, see Configure write access and Configure connection features for additional options. Or, if you are finished configuring your connection, click Create at the top right to create your connection.
Configure write access
Write access is necessary for the following features:
- CSV upload
- Materialization
- Input tables
- Dataset warehouse views
Configuration of write access also requires granting the necessary permissions in Snowflake. See Set up write access in Snowflake for all prerequisite steps.
If you require write access, click the toggle next to Enable write access*. Then, configure these fields:
-
In the Write database field, enter the name of the database where Sigma has write access.
-
In the Write schema field, enter the schema where Sigma has write access.
-
[optional] In the Materialization warehouse field, enter a separate warehouse where Sigma writes materialization queries. If you don't specify a materialization warehouse, Sigma uses the primary warehouse for this connection.
Configure connection features
In the Connection Features section, specify the following:
-
In the Connection timeout field, specify the amount of time, in seconds, that Sigma should wait for the query to return results before timing out. The default in 120 seconds. The maximum is 600 seconds (10 minutes).
-
[optional] Disable the Use friendly names toggle if you do not wish Sigma to automatically make column names from the data source more readable. For example, with Use friendly names enabled, a database column ORDER_NUMBER appears as Order Number.
-
[optional] In the Export warehouse field, enter the name of the virtual warehouse created for export queries. For more details, see Configure an export warehouse.
-
Click Create at the top right of the screen to create your connection.
Connect to Sigma using Snowflake Partner Connect
If you do not already have a Sigma Organization created, you can use Snowflake Partner Connect to create an organization and connect your Snowflake database with just a few clicks. You must have the ACCOUNTADMIN role in Snowflake to use Snowflake Partner Connect. To sign up with Snowflake Partner Connect:
- In the Snowflake UI, open Snowflake Partner Connect.
- Switch the user role to `ACCOUNTADMIN`.
- Select Sigma from the Partner Connect list.
- In the Connect to Sigma modal that appears, click Connect.
- Sigma opens in a new window and you are prompted to create your new organization.
Add Sigma's IP addresses to the allowlist
If you have IP allowlists enabled on Snowflake, you must add Sigma's egress IP addresses.
Sigma's IP addresses are listed on all individual connection pages in your Sigma Admin Portal.
To view them, follow these steps:
-
Open your Admin Portal to the Connection page.
-
Select any connection, or click Create Connection.
-
Look for the IP addresses listed under connection credentials.
Follow the instructions in Snowflake's Network Policies document.
Grant permissions in Snowflake
Sigma can see the databases, schemas, tables, and views granted to the account used to connect to Sigma.
If you connect to Sigma using Snowflake Partner Connect, the tool creates a new user PC_SIGMA_ROLE on your Snowflake instance. By default, this new user has all PUBLIC grants. To see additional data in Sigma, you can change the user who connects to Snowflake, or update the permission grants to the PC_SIGMA_ROLE user.
Avoid granting excessive permissions to the account you use when connecting to your data store. For example, Sigma service accounts do not require SYSADMIN-level access.
You can grant privileges to Sigma through three different methods:
- Snowflake UI
- SQL editor in the Snowflake Console, in the Worksheets tab
- SnowSQL
In all methods, grant USAGE privileges to the necessary databases and schemas, and SELECT privileges to the necessary tables. If you connected through Snowflake Partner Connect, grant privileges to the PC_SIGMA_ROLE. If you created your Sigma organization outside of Snowflake, give privileges to the role that you specified when you set up the connection in Sigma.
Update grants through SQL
When following the instructions to update grants through SQL:
- Replace YOUR_DATABASE_NAME with the name of your database.
- Replace YOUR_SCHEMA with the name of the schema you'd like to grant permissions to.
- Replace YOUR_ROLE with the role you used to connect to Sigma.
Enter the following commands into the SQL editor in the Worksheets tab for the Database you wish to give Sigma access to:
use WAREHOUSE PC\_SIGMA\_WH; use DATABASE **YOUR\_DATABASE\_NAME**; grant usage on database **YOUR\_DATABASE\_NAME** to role **YOUR\_ROLE**;
Enter the following command into the SQL editor for the schema you wish to give Sigma access to:
grant usage on schema **YOUR\_SCHEMA** to role **YOUR\_ROLE**;
Enter the following command into the SQL editor to grant access to all tables in the schema to Sigma:
grant select on all tables in schema **YOUR\_SCHEMA** to role **YOUR\_ROLE**;
Enter the following command into the SQL editor for the views you plan to list on Sigma:
grant select on all views in schema **YOUR\_SCHEMA** to role **YOUR\_ROLE**;
Update grants through SnowSQL
When following the instructions to update grants through SnowSQL:
- Replace YOUR_DATABASE_NAME with the name of your database.
- Replace YOUR_SCHEMA with the name of the schema you'd like to grant permissions to.
- Replace YOUR_ROLE with the role you used to connect to Sigma.
Enter the following SQL commands into SnowSQL:
use WAREHOUSE PC\_SIGMA\_WH; use DATABASE **YOUR\_DATABASE\_NAME**; grant usage on database **YOUR\_DATABASE\_NAME** to role **YOUR\_ROLE**; grant usage on schema **YOUR\_SCHEMA** to role **YOUR\_ROLE**; grant select on all tables in schema **YOUR\_SCHEMA** to role **YOUR\_ROLE**; grant select on all views in schema **YOUR\_SCHEMA** to role **YOUR\_ROLE**;
Update grants through the Snowflake User Interface
When granting permissions through the UI, you need to grant privileges at the Database, Schema and Table level.
- Select the Database you would like to grant privileges to. On the right-hand side of the screen there is a button labeled + Grant Privileges. Click that, then grant USAGE to the role you used to connect to Sigma.
- Click into the Database you just granted permissions for. Select “Schema” then click on the specific schema you’d like to grant permissions for. Click +Grant Privileges and then grant USAGE to the role you used to connect to Sigma.
- Click into the schema that you just granted privileges to. Select the table that you would like to be visible in Sigma. Click +Grant Privileges and then grant SELECT to the role you used to connect to Sigma. You will have to grant access to each table individually.
- You can also use SQL to grant access to all of the tables in the schema at once, using the SQL below. Replace YOUR_SCHEMA with the name of the schema you'd like to grant permissions to. Replace YOUR_ROLE with the role you used to connect to Sigma.
grant select on all tables in schema **YOUR\_SCHEMA** to role **YOUR\_ROLE**; grant select on all views in schema **YOUR\_SCHEMA** to role **YOUR\_ROLE**;
Updated 9 days ago