
Schedule a conditional export or alert
You can schedule exports that only send if specific data conditions are met, functioning as a conditional alert. This flexibility lets you fine tune recurring exports and ensure efficiency and relevance of the exported reports.
This document explains how to schedule a recurring export with a predefined data condition.
User requirements
The ability to add conditions to scheduled exports requires the following:
- You must be assigned an account type with the Schedule exports permission enabled.
- You must be the workbook owner or be granted Can explore or Can edit workbook permission.
Additional requirements might apply depending on the export destination.
About conditional exports and alerts
A predefined data condition acts as a filter to determine whether Sigma initiates a scheduled export. When an export is due, Sigma checks the data and only proceeds if the condition is met. The recurring schedule ensures that an export is timely, while the condition ensures it is relevant.
Schedule an export based on data availability
Schedule a recurring export that only initiates when a specific data element or input table meets a predefined data condition.
-
In a workbook header, click the caret (
 ) associated with the workbook's name and select Schedule exports....
 -
If this is the first schedule for the workbook, click Add Schedule, otherwise click + New schedule.
-
Turn on the toggle for Condition.
-
Configure the condition settings:
-
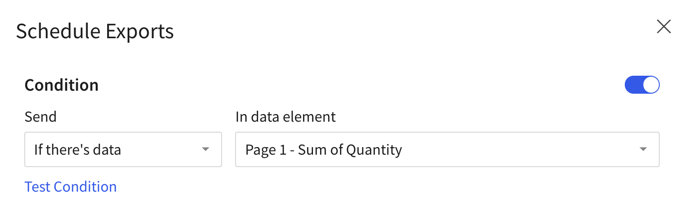
For Send, specify the condition under which to send the export:
- If there's no data: Export as scheduled if there is no data available in the target element.
- If there's data: Export as scheduled if data is available in the target element.
-
For In data element, select the target element to which the data availability applies.
Although the condition applies to a single target element, you can configure the schedule to export the entire workbook, specific pages, and individual elements.
-
Click Test Condition to check if the target element currently meets the condition. If the results don’t align with your expectations, confirm that you selected the correct condition and target element.
-
-
Complete the remaining sections in the Schedule Exports modal. For more information, see the following documentation based on the preferred export destination.
Destination availability depends on account type permissions.
-
Click Create to save the configured schedule.
Schedule an export based on a conditional statement
Schedule a recurring export that only initiates when a specific data element or input table satisfies a predefined conditional statement.
-
In the workbook header, click the caret (
) associated with the workbook's name and select Schedule exports.... -
If this is the first schedule for the workbook, click Add Schedule, otherwise click + New schedule.
-
Turn on the toggle for Condition.
-
Configure the condition settings:
-
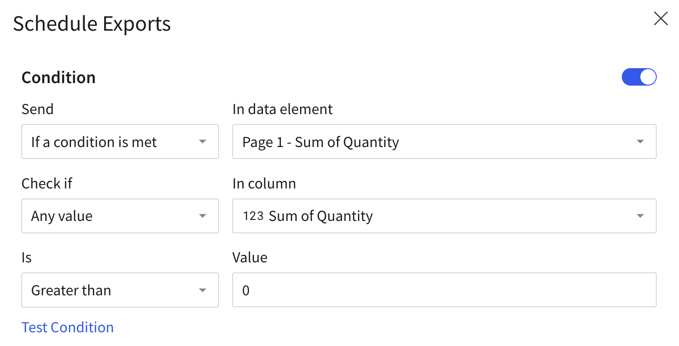
For Send, select If a condition is met to export as scheduled if a specific data condition in the target element is met.
-
For In data element, select the target element to which the condition applies.
Although the condition applies to a single target element, you can configure the schedule to export the entire workbook, specific pages, and individual elements.
-
Define the conditional statement. For Check if, select which element values to apply the condition to:
- Any value: The condition must match for one or more values in the column.
- All values: The condition must match for all values in the column.
If the selected element is a KPI, you can check additional conditions:
- {Element title}: One or more values in the element's Value property column must meet the criteria.
- Comparison value (%): One or more values in the element's Comparison property column must meet the criteria.
-
If you selected Any value or All values, for In column, specify the column to be used.
-
For Is, select a comparison operator.
-
For Value, select a comparison value.
-
Click Test Condition to check if the target element currently meets the condition. If the results don’t align with your expectations, confirm that you selected the correct condition and target element.
-
-
Complete the remaining sections in the Schedule Exports modal. For more information, see the following documentation based on the preferred export destination:
Destination availability depends on your account type permissions.
-
Click Create to save the configured schedule.
Schedule a conditional alert for an element
Schedule a recurring export as a conditional alert to monitor a specific data element or input table.
While you can create a conditional alert using the steps in the previous sections of this document, the following method auto-populates select fields in the Schedule Exports modal for quick alert configuration.
-
In the element toolbar, click
 More to open the element menu, then select Alert when.
You can only create alerts for published content. If the target element hasn’t been published or contains unpublished changes, Sigma prompts you to publish the workbook.

-
In the Schedule Exports modal, configure the alert:
Sigma configures a default conditional statement in the Send section (based on the type of target element), auto-populates the target element’s title as the email Subject line, and selects the target element in the Attachment field.
-
Customize the system-configured fields as needed, then complete the remaining sections. For more information, see Schedule an export based on data availability and Schedule an export based on a conditional statement in this document.
-
Click Create to save the schedule configurations.
-
Updated 5 days ago