
Export to Slack
If Slack notifications are enabled for your organization, workbooks, their pages, and individual elements can be sent to any channel in your Slack account on a set schedule or as-needed basis.
For example, you might want to provide a weekly uptime report to your management team, but your team communicates primarily in Slack. You can set up an export to a Slack channel or a specific user to make sure your management sees the report.
You can set multiple schedules for a workbook, and you can select either a published workbook or a tagged version of a workbook to export.
Changes you make to drafts or explorations cannot be exported until you publish them.
For a matrix of supported file formats, see Available export destinations and formats.
Slack exports capture data accessible to the user who initiated the export.
This documentation describes how to send and schedule exports to Slack.
User requirements
The ability to export to Slack requires the following:
- The Slack integration must be enabled for your organization. If you want to send notifications to a private channel, you must also add Sigma to the private channel. See Adding Sigma to a private Slack channel.
- You must be assigned an account type with the Export to Slack permission enabled.
- You must be the workbook owner or be granted Can explore or Can edit workbook permission.
Export size limit
The size limit for exports to Slack is 1GB per file. See Download, export, and upload limitations.
Send an ad hoc notification
To export information from a workbook to Slack:
-
From the workbook menu
 , select Export.
If the Slack option is not available, the workbook is in Edit mode. Either publish your draft or return to the latest published or tagged version of the workbook before attempting to export.
-
Select Slack.
-
In the To field, enter the name of the Slack channel, for example,
#team-channel.If you want to send the notification to a private channel, you must first add the Sigma notifications bot to the channel. Enter
@Sigmain your private channel to enable it. See Adding Sigma to a private Slack channel. -
(Optional) Enter a message in the Message field.
You can notify individuals by user ID. Get the Slack member ID for the user from their Slack user profile, then use the syntax
@<user_id>in the message. The angle brackets are required.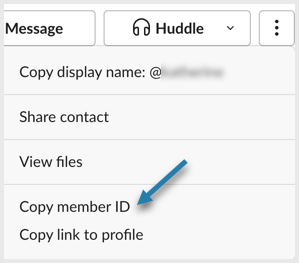
You can also use Slack channel @ mentions, such as
@hereor@channel, to notify people in the Slack channel when the notification is delivered. -
If the workbook has versions or bookmarks, select which one you want to send.
-
In the Attachment section, choose what you want to export as an attachment. You can export:
- An Entire workbook and export all workbook pages.
- A specific workbook page, by navigating to the workbook page and choosing Entire page.
- An element on a specific workbook page, by navigating to the workbook page and choosing the name of the element.
Select + Add to add more attachments.
-
For each attachment, select a supported file format. For a matrix of supported file formats, see Available export destinations and formats.
If you export multiple elements as Excel attachments, you can choose to export them as one Excel file with each element in its own tab. In More Options, select the checkbox for Merge Excel files.
Each attachment arrives in Slack as a separate message, except for merged Excel files.
-
(Optional) To include a link to the workbook in the message body, select the checkbox for Include workbook link.
Exports to Slack capture data accessible to the member who initiated the export. If a user clicks the workbook link, Sigma only displays what that individual user has permission to view. -
Click Export.
Schedule a Slack notification
Sigma generates exports from the workbook's latest published version. Draft changes are not sent unless they are published.
To schedule an export to Slack notification:
-
From the workbook menu
, select Schedule exports.... -
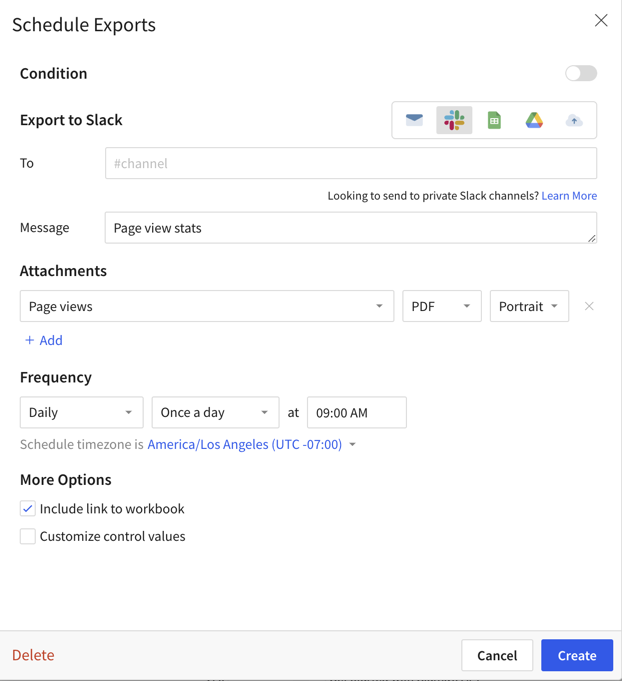
If this is the first schedule for the workbook, click Add Schedule, otherwise click + New schedule.
-
(Optional) You can define conditions for when Sigma sends the export. To turn on conditions, click the Condition toggle. For more information, see Schedule exports using conditions.
-
Select Slack.
-
In the To field, enter the name of the Slack channel, for example,
#team-channel.If you want to send the notification to a private channel, you must first add the Sigma notifications bot to the channel. Enter
@Sigmain your private channel to enable it. See Adding Sigma to a private Slack channel. -
(Optional) Enter a message in the Message field.
You can notify individuals by user ID. Get the Slack member ID for the user from their Slack user profile, then use the syntax
@<user_id>in the message. The angle brackets are required.You can also use Slack channel @ mentions, such as
@hereor@channel, to notify people in the Slack channel when the notification is delivered. -
In the Attachment section, choose what you want to export as an attachment. You can export:
- An Entire workbook and export all workbook pages.
- A specific workbook page, by navigating to the workbook page and choosing Entire page.
- An element on a specific workbook page, by navigating to the workbook page and choosing the name of the element.
Select + Add to add more attachments.
-
For each attachment, select a supported file format. For a matrix of supported file formats, see Available export destinations and formats.
If you export multiple elements as Excel attachments, you can choose to export them as one Excel file with each element in its own tab. In More Options, select the checkbox for Merge Excel files.
Each attachment arrives in Slack as a separate message, except for merged Excel files.
-
In the Frequency section, set the delivery schedule:
-
(Optional) Select the dropdown for Daily and select Weekly, Monthly, or Custom.
-
For Daily, select Once a day or Multiple times.
-
For Weekly, select which days of the week to send an email, and choose between Once a day or Multiple times.
-
For Monthly, select which day of the month to send an email, and the time of day.
-
For Custom, specify a schedule using cron syntax. See Set up a custom delivery schedule.
If you select Multiple times, specify the frequency. For example, every 2 hours on the :15 of the hour between 9 AM and 6 PM.
-
-
(Optional) Adjust the default schedule time zone using the dropdown menu.
-
-
(Optional) To include a link to the workbook in the message body, select the checkbox for Include workbook link.
Exports to Slack capture data accessible to the member who initiated the export. However, if a user clicks the workbook link, Sigma only displays what that individual user has permission to view. -
(Optional) Select the checkbox for Customize control values to filter the exported data according to the value of one or more workbook controls. See Apply control values to scheduled reports.
-
Click Create.
Updated 9 days ago